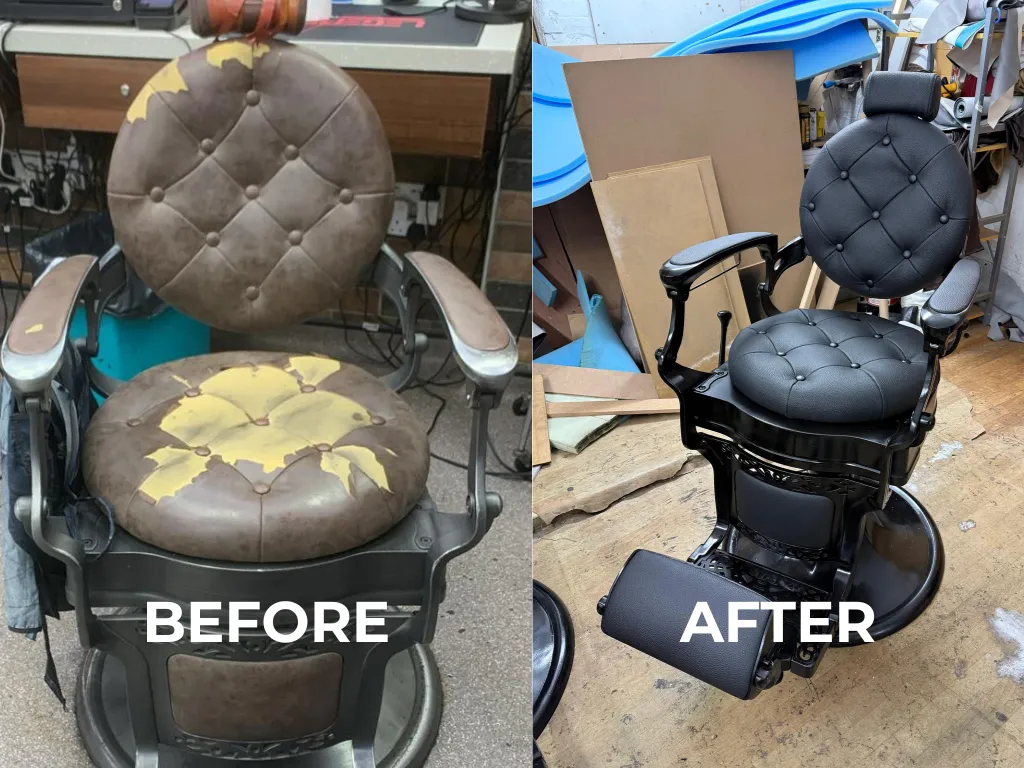
The barber chair is a central piece in traditional shops, symbolizing heritage and client comfort. High-traffic use leads to wear, chemical exposure, and mechanical fatigue. Reupholstering a barber chair is a significant undertaking that can extend its life by a decade and revitalize a shop’s aesthetic.
Pre-Restoration Assessment and Planning
Before diving into the upholstery, a comprehensive audit of the chair’s overall condition is vital to ensure the investment is sound.
Structural Audit: The mechanical integrity of the chair (hydraulic pump, swivel, reclining lever) must be the first priority. Reupholstering is a poor investment if these components are failing, unless a full mechanical restoration is also planned.
Documentation: Professionals must “Photo First,” documenting every angle, screw placement, and seam orientation before disassembly. This serves as a roadmap for reassembly.
Cost-Benefit Analysis
DIY Approach
$100 – $250
Materials only. 12-20 hours of labor.
Professional Services
$400 – $900
Expert labor & high-grade materials.
Selection of Essential Tools and Materials
Quality materials are the difference between a one-year fix and a ten-year investment.
Fabric: Marine-grade vinyl or Naugahyde is the industry standard due to superior resistance to moisture, hair dyes, and disinfectants like Barbicide.
Foam: High-density, fire-retardant polyurethane foam with a density of at least 2lbs is required for the seat to prevent “bottoming out.”
Tools: Pneumatic or heavy-duty electric staple gun, heat gun for manipulation, tack claw for staple removal, and industrial-grade adhesives like 3M Super 77.
Disassembly and Patterning Techniques
A systematic approach to disassembly saves hours of frustration during the re-mounting phase.
Hardware Management: Place all screws, bolts, and washers in labeled bags corresponding to specific parts (headrest, armrests, seat, backrest).
Precision Patterning: Old covers should be carefully removed by pulling staples, not cutting. Original pieces serve as your templates. When cutting new vinyl, add a “margin of error” of 1/2-inch to 1-inch.
Execution: The Upholstery Process
1. Foam Application
Cut foam 1/2-inch larger than the base for a plump look. Bevel the edges with an electric carving knife for a smooth transition to the frame.
1. Foam Application
Cut foam 1/2-inch larger than the base for a plump look. Bevel the edges with an electric carving knife for a smooth transition to the frame.
Navigating Diverse Restoration Perspectives
Techniques vary among masters of the craft. Here are the common debates in the restoration world:
Heat Gun vs. Hair Dryer: Some recommend a hair dryer for beginners as excessive heat from a professional gun can lead to premature cracking.
The Foundation: Modernists replace old zig-zag springs with plywood for durability; purists argue this destroys the classic “ride” of the chair.
Sewing vs. No-Sew: Professional standards always dictate sewing cushions with a walking-foot machine to maintain the structural “box” shape.